Recent Updates

02:29

List and explain lathe accessories and attachments

We were discussing the types of lathe machines and their use, Different parts of the lathe machine and their functions and complete specifications of the lathe in our previous post.  


We will see the Accessories of a lathe machine i.e. devices that are used for holding and supporting the work and the tool on the lathe with the help of this post.  


So let's start now 


Chucks


Chucks are basically used for holding the workpiece on a lathe machine during the machining operation. Let us see the commonly used chucks as mentioned below   


  1. Three-jaw universal chuck 

  2. Four-jaw independent chuck 

  3. Combination chuck 

  4. Magnetic chuck 

  5. Collet chuck 

  6. Air or hydraulic operated chuck 

  7. Drill chuck


Three-jaw universal chuck 

In a three-jaw universal chuck or self centering chuck, as displayed in the following figure, all three jaws move together in equal amounts to clamp the work. Therefore the job is automatically centered. 


Figure 1 : Three-jaw universal chuck


The movement is achieved by rotating the chuck key in any one of the three pinions which meshes with the teeth cut on the underside of the scroll disc. The scroll disc having a spiral groove cut on the top face meshes with the teeth of jaws. The chuck is used for holding cylindrical or hexagonal shaped workpieces. 


Four-jaw independent chuck 

In a four-jaw independent chuck, as displayed in the figure, each jaw is moved independently by rotating the screw which meshes with the teeth cut on the underside of the jaw. These chucks are used for holding square, octagonal or large irregular components. 


Figure 2 : Four-jaw independent chuck 


Combination chuck 

A combination chuck carries the combination of both the above principles.

It is provided with four jaws which can be operated either by the scroll disc or individually by

separate screws.


Magnetic chuck 

These chucks are used to hold steel workpieces that are too thin to be held in an ordinary chuck. The face of the chuck is magnetized by permanent magnets contained within

the chuck. 


Collet chuck 

This chuck provides a quick means of holding the bar stock. Draw-in type collets are in common use. Their front portion is splitted which provides a spring action and hence the grip.


Air or hydraulic operated chuck 

Air or hydraulic pressure is used to press the jaws against the job in this chuck. The pressure is provided by a cylinder and piston mechanism mounted at the back of the headstock and controlled by a valve by an operator.


Drill chuck 

A drill chuck is used for holding straight shank drill, reamer or tap for drilling, reaming or tapping operations. This may be held either in the headstock or tailstock. This has self-centering jaws and is operated by a key. 


Face plate

A face plate is a large circular disc having a threaded hole at the center so that it can be screwed to the nose of the lathe spindle. It contains open slots or T-slots in its face. The workpiece is mounted on it with the help of bolts, T-nuts and other means of clamping. It is used for holding workpieces that cannot be conveniently held by chucks.


Angle plate

An angle plate is used for holding a workpiece in conjunction with a face plate. If mounting of the workpiece directly on the face plate is not possible, the angle plate is used for that purpose.


Lathe centers 

Lathe centers are hardened steel devices used for holding and locating the work to be turned. The center that is fitted in the headstock spindle is called the live center. The center that is used in the tailstock is called dead center. The various forms of lathe centers are shown in the following figure. 


Figure 3 : Lathe centers 


Ordinary center:

This is used for most general works 


Ball center:

This has a ball shape at the end to minimize the wear and strain. This is particularly suitable for taper turning. 


Tipped center:

In the tipped center, a hard alloy tip is brazed into a steel shank. The hard tip is wear resistant. 


Half center:

The half center is similar to an ordinary center except that a little less than half of the center has been ground away. This feature facilitates the facing of the bar ends without removal of the center. 


Revolving center:

The ball and roller bearings are fitted into the housing to reduce friction and to

take up end thrust. This is used in the tailstock for supporting heavy work revolving at a high speed. 


Pipe center: This is used for supporting pipes, shells and hollow end jobs. 


Lathe cutting tools   


Cutting tools used for machining are classified into two groups 


  1. Single point cutting tool 

  2. Multipoint cutting tool 


Single point cutting tools have only one cutting edge, while multipoint cutting tools have several cutting edges (drill, milling cutter). Single point cutting tools are used on lathes.


Single point lathes tools classification 


Single point lathes tools are classified in many ways. The main classification is as mentioned below. 


According to the direction of feed: 


The tools may be right-hand and left-hand threaded tools. In a right-hand tool, the cutting edge is on the left-hand side of the operator, the right-hand tool cuts from right to left, i.e. tool is fed from the tailstock to the headstock. In a left-hand tool, the cutting edge is on the right-side of the operator. The left-hand tool cuts from left to right as shown in the following figure.  


Figure 4 : Right hand tools and Left hand tools 


According to method of manufacturing the tool: 


These tools may be classified as mentioned below 

  1. Solid tool 

  2. Brazed tool 

  3. Inserted or bit tool


A solid tool is made of either high speed steel or carbide bar and the cutting edge is formed

by grinding one end of the bar. In a braze tool, the carbide tip is brazed to a shank of low grade material. In an inserted bit tool, the carbide or ceramic bit or a square or rectangular shape is held mechanically in a tool holder. 


According to the method of using the tool: 

Single point tools are classified as turning, facing, cutting off, boring, grooving, etc.  


Tool nomenclature 


The cutting tool nomenclature comprises the various parts of a tool and various tool angles. The complete nomenclature of a single point cutting tool is displayed in the figure.  


  1. Face : It is the surface over which the chip flows. 

  2. Flank : It is the surface below the cutting edge. 

  3. Nose : The nose is the junction of the side and end cutting edge.  

  4. Side cutting edge : It is formed by the intersection of the flank and the side flank. 

  5. It does the main work in cutting.

  6. End or Auxiliary cutting edge : It is the intersection of face end flank.

  7. Tool angles : In a single point tool, there are various angles, each of them has a definite purpose.


Figure 5 : Single point cutting tool nomenclature 


Back rake angle: 

It measures the downward slope of the top surface of the tool from the nose to the rear along the longitudinal axis. Its purpose is to guide the direction of chip flow. The size of the angle depends upon the material to be machined. 


A back rake angle may be positive, neutral or negative. The angle is positive if the face slopes downwards from the tip towards the shank. It is used to cut low tensile strength and nonferrous materials. The angle is negative if the face slopes upwards. It is used to cut high tensile strength materials for heavy feed and interrupted cuts. 


Side rake angle:  

It measures the slope of the top surface of the tool to the side in a direction perpendicular to the longitudinal axis. It also guides the direction of the chip away from the job.


Side relief angle: 

It is the angle made by the flank of the tool and a plane perpendicular to the base just under the side cutting edge. This angle permits the tool to be fed sideways into the job, so that it can cut without rubbing. 


End relief angle: 

It is the secondary relief angle between a plane perpendicular to the base and

the end flank.


Side cutting edge angle: 

It is the angle between the side cutting edge and the longitudinal axis of the tool. 


Nose radius: 

It is the curve formed by joining the side cutting and end cutting edges. The angle so formed between cutting edges is called nose angle and the radius of the curve is called nose radius. 


We will now study the post "Drilling Machine : Definition, Nomenclature And Types" with the help of the next post. 


Reference

Engineering Practices by Mr. S. SUYAMBAZHAHAN 

20:01

What are the specifications of lathe machine?

We were discussing the types of lathe machines and their use and Different parts of the lathe machine and their functions in our previous post.  


We will see how a lathe can be completely specified. We will basically study here the complete specifications of the lathe with the help of this post.  


Figure : Lathe Machine 


Specifications of lathe 


We can specify a lathe machine completely with the following factors or parameters 


  1. Height of the centers. 

  2. The swing over the bed: Largest diameter of work that will rotate without touching the bed. It is generally twice the height of centers. 

  3. The length between centers: It is the greatest length of the work that can be held between the headstock and tailstock centers. 

  4. Type of bed: It may be a straight or gap bed. 

  5. Spindle speed range: Number of speeds. 

  6. Width of the bed. 

  7. Metric thread pitches. 

  8. Cross feed and longitudinal feeds. 

  9. Cross-slide travel. 

  10. Tailstock sleeve travel. 

  11. Horsepower of the main motor and RPM. 

  12. Chipping Dimensions: Length  ́ Height  ́ Width  ́ Weight.


We will study the Accessories of a lathe machine i.e. devices that are used for holding and supporting the work and the tool on the lathe with the help of next post. 


Reference

Engineering Practices by Mr. S. SUYAMBAZHAHAN 

01:17

Subsidence: The 5 Biggest Causes And How To Reduce The Risk

We do not need to be a geological professional or a civil or structural engineer in order to understand and digest the subsidence and its main causes. 


If we want to define it in simple words then we can say subsidence is basically a downward shifting of the ground which can impact the buildings in horrible ways. 


If a geological professional or a civil or structural engineer is informing you that your home is suffering from subsidence, It indicates that your home is sinking. 


How will you understand that the structure is suffering with subsidence? 


Structures or walls that bend, bow, lean or are cracked will be the best identifying signals of a subsiding wall or structure. 


Let us see here the top 5 reasons that we should watch If we are worried about our home or office subsiding 


  1. Water Erosion 

  2. Tree roots and vegetation 

  3. Reactive clay 

  4. Poor workmanship 

  5. Vibrations 


Water Erosion 


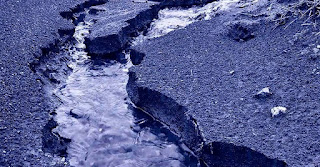
Figure 1 : Water erosion subsidence 


Water erosion is basically considered as one of the common reasons for subsidence. The erosion of foundational soil usually occurs when there is continuous flow of water pools into the soil. 


It results in the soil aerating and weakening. We must note here that water will find its way into and below the footing of buildings from storm water drains, burst surge pipes or mains inlet pipes that are cracked and leaking. As the soil starts to absorb more and more water, it starts to subside and causes structural challenges in the buildings. 


Tree roots and vegetation


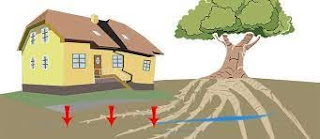
Figure 2 : Tree roots and vegetation subsidence 


It will cause subsidence by removing the water out of the soil. 


We must note here that If a particularly thirsty large plant or any new tree has been placed near our home, what will happen ? 


It will undermine the balance of the soil and hence our home sits on as it will suck the water out of the ground. It will be aerated and unstable and it will cause our buildings to subside because the plants will draw water out of the soil. 


Sickly vegetation could also be something to be very careful of as it will have many roots and hence it will take up a lot of space underground and cause the soil to aerate and in hence, subside. 


Reactive clay 


Figure 3 : Reactive clay subsidence 


It is basically very dense soil that contracts or expands according to the changes in the seasons through the entire year. 


Reactive clay will absorb the moisture and hence will expand during the cold seasons. Similarly, it will contract as it dries up during the hot seasons. 


Such movement naturally comes according to the changes in the weather but reactive clay will be a burning issue when new elements will be introduced to the environment. 


The addition of trees and plants, a new drainage system or any modified or renovated drainage system may draw more water than usual out of the reactive clay. 


As water will be drawn out of the clay by such changes and hence there might be dramatic subsidence that can occur and in turn it will ruin the structural foundation of our buildings. 


Poor workmanship


Figure 4 : Poor workmanship subsidence 

Negligence and human error will be the prime cause of poor workmanship and It is considered as one of the major causes of the subsidence. 


If the contractors or the builders are in a hurry to finish the project or job, they will cut the corners wherever they will be able to cut. Many contractors or the builders don't bother pouring trenches & compacting the ground perfectly in order to develop the stable footing. 


We must note here that, without compacting properly, we will have aerated, weak or voided soil that can subside very easily further down the track. We have observed so many areas where the contractors or the builders also avoid installing the quality drainage. It results in the water leaks that soak into soil and cause erosion & eventually subsidence. 


Vibrations


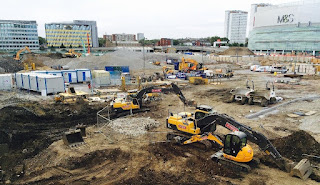
Figure 5 : Vibration subsidence 


We must note here that if there is constant vibrations in the ground, it will shake the soil to the level where it will become aerated and hence unstable. 


Following activities, as mentioned below, can cause subsidence as there will be consistently vibrations in the ground. 


  1. Activities nearby construction sites where continuously heavy earth moving equipment will be working or other construction work will be executing. 
  2. Activities at main roads where continuous heavy trucks, other heavy vehicles and cars pass. Activities at airports where there will be planes weighing thousands of tons land and take off. 
  3. Activities at heavy industrial activities such as mining.
  4. Heavy train consistently running at high speed.


Therefore, we should consider the above condition to build our homes or offices accordingly. However, if we are having any issues related to subsidence, we can connect with Mainmark, The Mainmark Group to find out the best solutions for the same. 

21:59

What are the parts of a welding helmet?

We have seen the overview of a welding process, Arc welding process, Gas welding process types of flames in Gas welding and Difference between Arc welding and Gas welding, difference between DC  welding and AC welding, soldering and brazing, common welding defects and Safety precautions and PPE required during welding activities with the help of our previous posts.


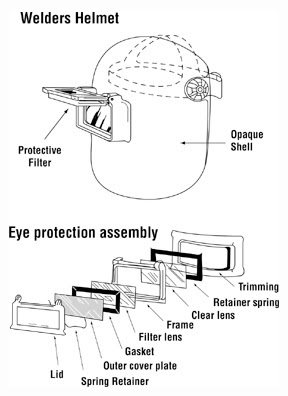
Hand screens or hand shields or welding helmets provide protection to eyes by using an assembly of following mentioned parts or components 

Figure : Welding Hand Screen Components 


  1. Helmet shell - It must be opaque to light and also resistant to heat, impact and electricity. 

  2. Outer cover plate will be made of polycarbonate plastic. It protects from impact, UV radiation and also from scratches. 

  3. Filter lens will be made of glass consisting of a filler that reduces the amount of light which is passing through to the welder's eyes. Filters will be available in various shade numbers i.e. from 2 to 14. The higher the shade number, the darker the filter will be and hence the lesser light will pass through the lens. 

  4. Clear retainer lens will be made of plastic. It prevents any broken pieces of the filter lens from reaching the welder's eyes. 

  5. Gasket will be made of heat insulating material. It will be between the filter lens and the cover lens. It protects the lens from sudden changes in the heat that could result in it breaking. There are some welding helmets models where the heat insulation will be given by the frame mount instead of a separate gasket.


We will now see “Different parts of the lathe machine and their functions” and we will also study the complete specifications of the lathe in our next post. 


Reference 

Engineering Practices By Mr. S. Suyambazhahan


00:18

Different parts of lathe machine and their functions

We were discussing the types of lathe machines and their use in our previous post. Now we will see here the different parts of the lathe machine and their functions with the help of this post. 

Center lathe

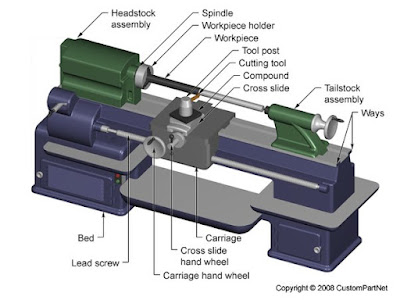
The principal parts of a center lathe are labeled and displayed here in the following figure.  A brief description of these parts are described as follows. 

Figure : Center Lathe Machine 


Bed

The lathe bed forms the base of the machine. It is made of cast-iron or alloy steel. It consists of flat or inverted V-shaped inner and outer guideways to guide the carriage, headstock and tailstock. 

The height of the lathe bed should be appropriate to enable the technician to do his job easily and comfortably. Many lathes are made with a gap in the bed. This gap is used to swing extra large diameter pieces. 

Headstock

The headstock is fixed at the left-hand side of the lathe bed on the inner guideways. It supports the spindle. The spindle is driven through the gearbox which is housed within the headstock. 

The function of the gearbox is to provide a number of speeds to the spindle. The spindle is always hollow to feed the barstock through that hole for continuous production. The nose of the spindle is threaded to mount the chuck or face plate. 

Tailstock

The tailstock is displayed here in the following figure. It is located on the inner guideways at the right-hand side of the operator. The main purpose of the tailstock is to support the free end of the workpiece when it is machined between centers. It is also used to hold tools for operations such as drilling, reaming, tapping, etc. 

To accommodate different lengths of work, the body of the tailstock can be adjusted along the guideways by sliding it to the required position and can be clamped by the bolt and plate. The body is bored to act as a barrel which carries a quill that moves in and out of the barrel. The movement of the quill is achieved by means of a hand wheel and a screw which are engaged with a nut fixed in the quill. The hole in the open side of the quill is tapered to mount lathe centers or other tools like twist drills or boring bars. 

The upper body of the tailstock can be moved towards or away from the operator by means of the adjustment screws to offset the tailstock for taper turning. 

Figure : Tailstock 

Carriage

The lathe carriage is displayed here in the following figure. It has several parts that support, move and control the cutting tool. It consists of the following parts as mentioned below. 

  1. Saddle 

  2. Cross-slide 

  3. Compound rest 

  4. Tool post 

  5. Apron

Figure : Lathe Carriage 

Saddle 

The saddle is an H-shaped casting that fits over the bed and slides along the guideways. It carries the cross-slide and tool post. 

Cross-slide  

The cross-slide carries the compound rest and tool post. It is used to give depth to a cut.

Compound rest  

It has a circular base with graduations and is mounted on the cross-slide. It is used for turning short tapers and angular cuts.

Tool post  

This is located on the top of the compound rest to hold the tool and to enable it to be adjusted to a convenient working position. The various types of tool posts used in a lathe are displayed here in the following figure. 

Figure : Tool Posts used in turning 

Single screw tool post 

This consists of a round bar with a slotted hole in the center for fixing the tool by means of a set screw. The tool post with a concave ring and convex rocker slides in a T-slot on the top of the compound rest. The height of the tool point can be adjusted by tilting the rocker and clamping in position by means of a set screw.

Four-way tool post  

In this type of tool post, four sides are open to accommodate four tools at a time. 

Quick change tool post 

Modern lathes are provided with this type of tool posts. Instead of changing the tools, the tool holder is changed in which the tool is fixed. This is expensive and requires a number of tool holders. But it has the advantage of ease of setting the center height and rigidity of the tool. 

Apron 

The apron is fastened to the saddle and hangs over the front of the bed. It contains gears, clutches for transmitting motion from feed rod to the carriage and also contains a split nut which engages with a lead screw while thread-cutting. 

Lead screw 

The lead screw is a long screw with ACME threads. It is used for transmitting power for automatic feed or feed for thread cutting operation. 

We will see how a lathe can be completely specified. We will basically study the complete specifications of lathe in our next post. 

Reference 

Engineering Practices By Mr. S. Suyambazhahan

Popular Posts